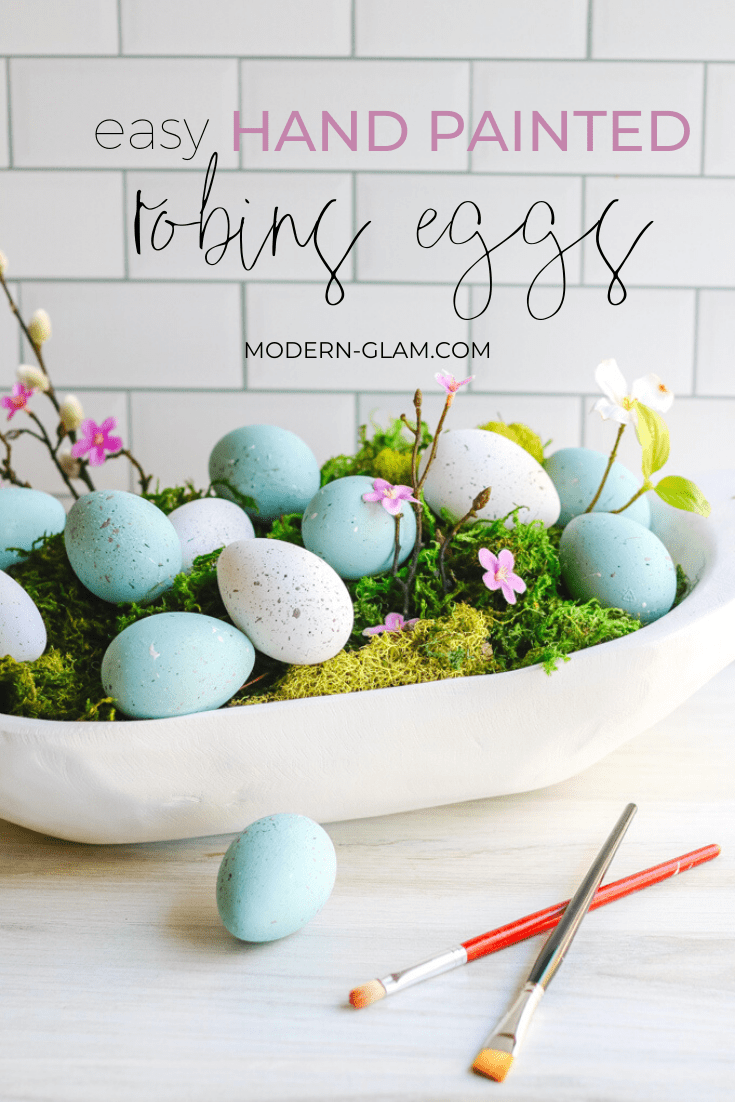
These DIY Painted Robins Eggs are easy to make and are perfect for decorating for Spring or Easter!

I can’t wait to show you how to paint these cute speckled robins eggs. We will paint craft eggs to look like beautiful robins eggs for your spring or easter decorating.
Easy DIY Painted Robins Eggs
Can you believe it is already March? Time to decorate for spring!

When I started switching up the decor in my home this past weekend, I was wanting some fun and colorful spring decorations. So, while browsing the aisles at Target I spotted a carton of craft eggs for $3 and knew they would be the perfect addition to my spring decor.

With a little paint and time, I had a dozen beautifully colored eggs. I love the Robins Egg blue color and how soft they look in my neutral home.
Let’s make some painted robins eggs together and I can’t wait to show you how I am going to use them in my spring and Easter decorating!
And if you missed it, last week I shared this Spring Cherry Blossom Printable that is another great and FREE decor idea for spring!
How To Paint Cute Speckled Robins Eggs

DIY Painted Egg Supplies
For this easy project you will need:
Paint
Foam Paint Brush
Coarse bristled brush (or a toothbrush)
Paper plates or cups to mix paint
Craft Eggs

The Perfect Robins Egg Blue Color
Once you have your supplies together, get started mixing your paint to make the perfect robins egg color. This may take a bit of trial and error. I used paint that I had on hand because I didn’t want to buy new paint.
But, I bet you could find a shade of paint at the craft store that is pretty close without having to mix up paint. Although I will admit that I find the challenge of making the perfect paint shade so fulfilling when I get it right!

For the robins egg color I used a combination of these paint colors:
Delta Creative Ceramcoat in Tropic Bay Blue
Folk Art in Summer Sky
The perfect painted Robins Egg color is a blueish color with a tint of green and gray. The color should be subtle yet not dreary.
Step 1: Paint

Once you have the perfect color, paint your robins eggs using the foam brush. I chose to leave 4 of the eggs white.
Painting the eggs can be tricky! But, you can use rubber gloves if you don’t want to get your fingers all mucked up with paint.
I painted the eggs all the way around while I held them with two fingers. Then I placed them on the table to dry and touched up the spots where my fingers had been. I ended up using two coats of paint to get a nice solid color and touch up any blemishes from when they were drying.
Step 2: Speckling

Once the painted eggs have dried, it’s time to add the classic robins egg speckling.
To get the speckles, I used a combination of a dark brown, taupe and white paint.

Using the coarse bristled brush, dip just the tip of the brush in one of the paint colors. Pointing the brush at the egg, run your fingernail along the bristles, flicking the paint onto the surface of the egg.
Repeat with the other colors.
You will only be able to paint one side of the robins eggs at a time. Let the paint dry in between. Then, rotate the egg and repeat the process on the other side.

There is nothing perfect about the speckling. And it can be quite messy. So use a drop cloth or place newspaper on your work surface. But, the results are so worth it! Look at how cool all the different colors look against the pretty blue color.
I used the same technique on the white eggs.
Now, I can’t wait to show you how I used these eggs in my spring decor. Here is a sneak peak, more to come later this week!


Have fun making these painted robins eggs!
More Easter Egg Decorating Ideas

A few years ago I Decorated Brown Eggs with a gold sharpie and I love how they turned out. Check out the post for more pics!

And this is one of my favorite posts. Learn how to Dye Easter Eggs Naturally using fruit and veggies!


Let's connect! Pinterest, Instagram, Facebook and subscribe to my emails for new posts sent straight to your inbox!
- DIY Painted Robins Eggs for Easter Decor - March 15, 2025
- Chocolate Bunny Cupcakes for Easter - March 12, 2025
- Easy Cinnamon Roll Bunnies With Orange Glaze - March 5, 2025


Corrie
I just wanted to say, you nailed the robin’s egg blue! So lovely.
ashley
Thank you!!!